Dynamic User and Device Enumeration on steroids
DUDE is evolving! A lot has happened since the beginning of DUDE.
Let me share the initial purpose of the DUDE solution to refresh your memories:
The purpose of this solution is to have dynamic user groups based on any attribute supported in Azure AD groups and a corresponding assigned device group. The script will then check who’s in the user group, grab all the users devices from Intune and add them to the corresponding device group. If a user is removed from the user group, their device will also automatically be removed from the device group.
New features has arrived and DUDE is now a broader automation solution to help you manage your users and devices with ease.
DUDE Architecture & Features

- DUDE User Groups (Required)
DUDE will loop through all DUDE user groups and get the user group members. - User Group Members Devices (Required)
DUDE will grab the user group members devices from Intune based on the primary user of the device in Intune. - DUDE Device Groups (Required)
DUDE will add the users devices to a corresponding device group. If a user is removed from the user group, their device will also automatically be removed from the device group. - Scope Tags (Optional)
To be able to delegate permissions and other important things in a dynamic and automated way, I highly recommend assigning scope tags to the DUDE Device groups. This is a one time setup per DUDE device group. - Administrative Units (Optional)
The same goes for admin units. We want to be able to delegate permissions to things like Azure LAPS, BitLocker etc. With Scope Tags and Admin Units we can really scope just the permissions needed for IT support or local IT. If you enable this feature DUDE will add and remove users and devices to a corresponding Admin Unit based on the DUDE user and device groups. - Defender for Endpoint (Optional)
The latest addition to DUDE is the automation of machine tags in Defender for Endpoint. If you enable this feature DUDE will add or remove machine tags on devices onboarded in Defender for Endpoint based on the DUDE user group members devices. This tag can then be used dynamically in device groups in Defender for Endpoint to help with delegation, policies, exclusions etc.
DUDE Pre-Reqs
You need the following in place to setup DUDE:
- DUDE Users Azure AD Groups
- DUDE Devices Azure AD Groups
- Scope Tags (Optional)
- Administrative Units (Optional)
- Defender for Endpoint (Optional)
You can create all this manually by following my older blog posts but nobody likes manual work so we will use PowerShell instead.
Grab the script on my GitHub: DUDE-CreateStuff.ps1
This script uses “Get-MsalToken”, if you don’t know what that is, head over to this great post by Ben Reader: Authenticating to Microsoft Graph with PowerShell
Before you run the script, make sure to update the variables. You can add as many groups as you want. Remember that it’s critical that the UserGroupName, DeviceGroupName and AdminUnitName variables are consistent and have a matching ending. Other variables can be set however you prefer but these ones are critical:
UserGroupName should always start with “DUDE Users “
DeviceGroupName should always start with “DUDE Devices “
AdminUnitName should always start with “DUDE ”
Whatever you choose to put after this in the names have to match between the three. In this post I will use the following names:
User Group Names:
DUDE Users Rock
DUDE Users Metal
Device Group Names:
DUDE Devices Rock
DUDE Devices Metal
Admin Unit Names:
DUDE Rock
DUDE Metal
#region Variables
$ClientId = ""
$TenantId = ""
$CreateScopeTags = $True
$CreateAdminUnits = $True
$Groups = @(
    [PSCustomObject]@{
        UserGroupName           = "DUDE Users Rock"
        UserGroupDescription    = "Rock Users"
        UserGroupMembershipRule = "(user.department -eq `"Rock`")"
        DeviceGroupName         = "DUDE Devices Rock"
        DeviceGroupDescription  = "Rock Users Devices"
        ScopeTagName            = "Rock" # Only needed if $CreateScopeTags = $True
        ScopeTagDescription     = "Rock" # Only needed if $CreateScopeTags = $True
        AdminUnitName           = "DUDE Rock" # Only needed if $CreateAdminUnits = $True
        AdminUnitDescription    = "Rock" # Only needed if $CreateAdminUnits = $True
    }
    [PSCustomObject]@{
        UserGroupName           = "DUDE Users Metal"
        UserGroupDescription    = "Metal Users"
        UserGroupMembershipRule = "(user.department -eq `"Metal`")"
        DeviceGroupName         = "DUDE Devices Metal"
        DeviceGroupDescription  = "Metal Users Devices"
        ScopeTagName            = "Metal" # Only needed if $CreateScopeTags = $True
        ScopeTagDescription     = "Metal" # Only needed if $CreateScopeTags = $True
        AdminUnitName           = "DUDE Metal" # Only needed if $CreateAdminUnits = $True
        AdminUnitDescription    = "Metal" # Only needed if $CreateAdminUnits = $True
    }
)
#endregion
The script output should look something like this:
Group 1 of 2: Rock
Usergroup "DUDE Users Rock" was successfully created
Devicegroup "DUDE Devices Rock" was successfully created
Scopetag "Rock" was successfully created
Scopetag "Rock" was successfully assigned
AdminUnit "DUDE Rock" was successfully created
Group 2 of 2: Metal
Usergroup "DUDE Users Metal" was successfully created
Devicegroup "DUDE Devices Metal" was successfully created
Scopetag "Metal" was successfully created
Scopetag "Metal" was successfully assigned
AdminUnit "DUDE Metal" was successfully created
You’re now ready to setup DUDE!
DUDE Setup
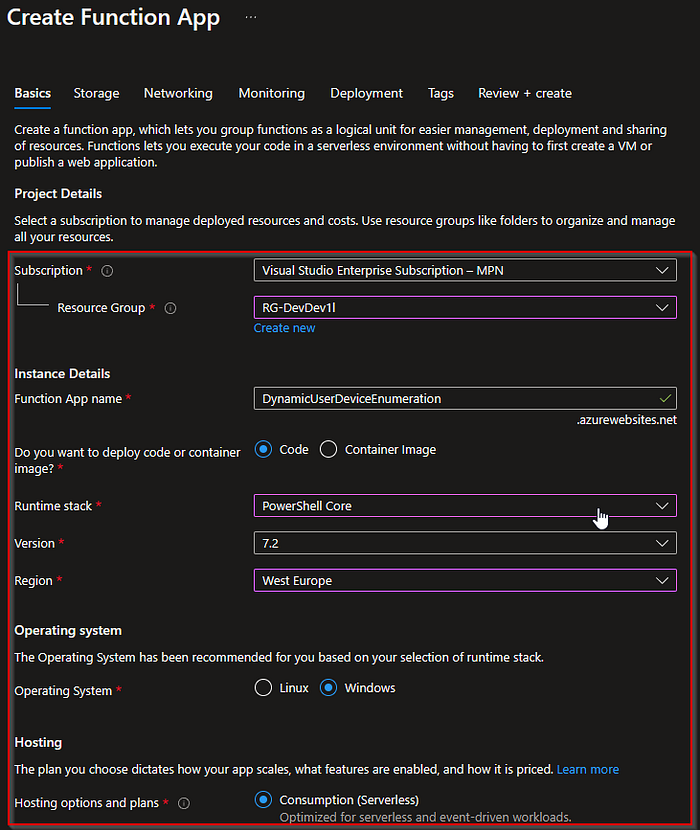
First we need to create our function app! Go to Function App — Microsoft Azure, click “Create” and fill in the required information and click “Next”:
I will not go into azure functions pricing in this post, you can read about it here, however there are some limitations that we need to consider, like the fact that the consumption plan have a maximum runtime of 10 min. More info about azure functions scale and hosting can be found here. For the purpose of this blog I will select the consumption plan.
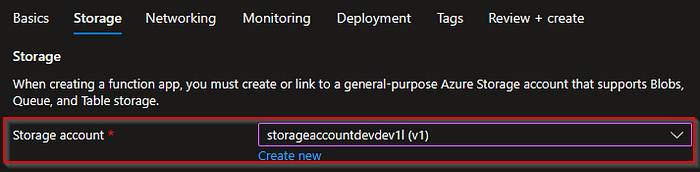
Select a storage account and click “Next”:
On the Networking tab, hit “Next”
Enable Application Insights and press “Next”:

On the Deployment tab, hit “Next”
On the Tags tab, hit “Next”
Review your settings and press “Create”.
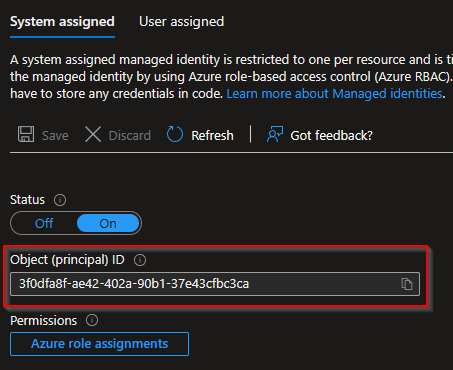
We will use a managed identity to access our resources securely. When the deployment is completed, head back to Function App — Microsoft Azure, select your newly created function app, select “Identity”, enable system assigned managed identity, hit save and make a note of the “Object (principal) ID”
We need to add the permissions needed via PowerShell. Install the AzureAD module if you haven’t already (Install-Module AzureAD). Make sure to update the $PrincipalID variable before executing. If you don’t want to use the Defender for Endpoint feature of DUDE you can set $RunDefender = $False to skip those permissions.
# Variables
$PrincipalID = "3f0dfa8f-ae42-402a-90b1-37e43cfbc3ca"
$RunDefender = $True
# Add permissions
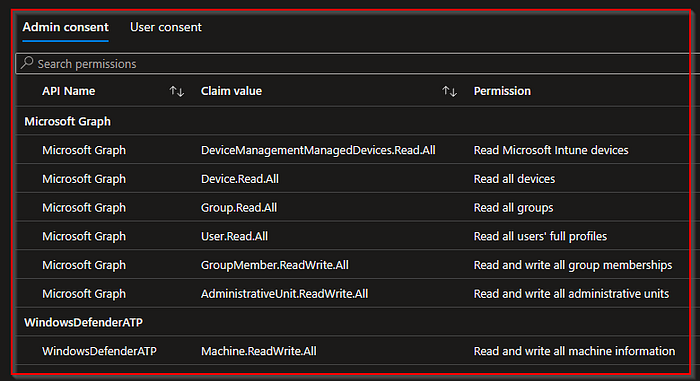
$GraphPermissions = `
"Device.Read.All", `
"DeviceManagementManagedDevices.Read.All", `
"Group.Read.All", `
"GroupMember.ReadWrite.All", `
"User.Read.All", `
"AdministrativeUnit.ReadWrite.All"
if ($RunDefender) {
$DefenderPermissions = `
"Machine.ReadWrite.All"
}
Connect-AzureAD
$GraphServicePrincipal = Get-AzureADServicePrincipal -SearchString "Microsoft Graph" | Select-Object -first 1
$GraphAppRoles = $GraphServicePrincipal.AppRoles | Where-Object { $GraphPermissions -contains $_.Value -and $_.AllowedMemberTypes -contains "Application" }
foreach ($Role in $GraphAppRoles) {
New-AzureAdServiceAppRoleAssignment -ObjectId $PrincipalID -PrincipalId $PrincipalID -ResourceId $GraphServicePrincipal.ObjectId -Id $Role.Id
}
if ($RunDefender) {
$DefenderServicePrincipal = Get-AzureADServicePrincipal -SearchString "WindowsDefenderATP" | Select-Object -first 1
$DefenderAppRoles = $DefenderServicePrincipal.AppRoles | Where-Object { $DefenderPermissions -contains $_.Value -and $_.AllowedMemberTypes -contains "Application" }
foreach ($Role in $DefenderAppRoles) {
New-AzureAdServiceAppRoleAssignment -ObjectId $PrincipalID -PrincipalId $PrincipalID -ResourceId $DefenderServicePrincipal.ObjectId -Id $Role.Id
}
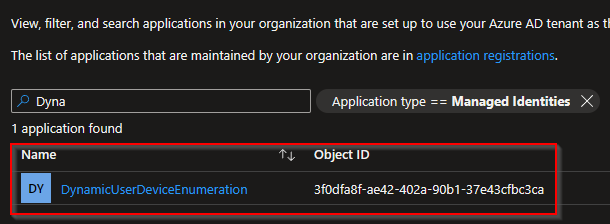
}Head over to Enterprise applications — Microsoft Azure to verify the permissions. Select “managed identities” as the application type and open your system assigned managed identity. The object ID value matches the object ID of the managed identity that you previously created.
Select “permissions” and it should look something like this:
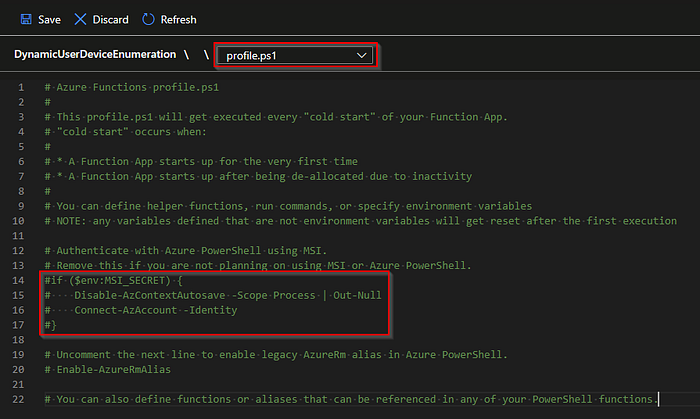
Head back to Function App — Microsoft Azure, select your function app, select “App files”, select “profile.ps1”, remove the following lines or use # and click “Save”
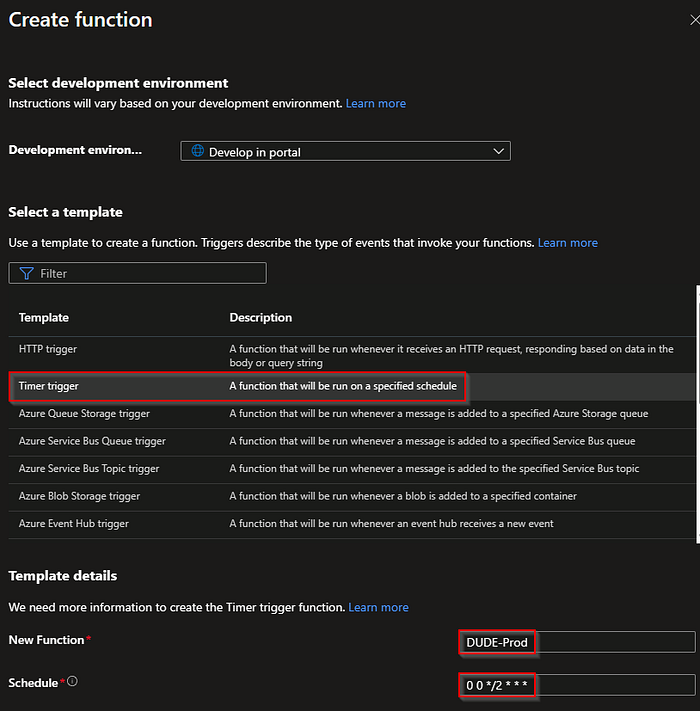
Select “Functions”, click “Create”, select “Timer trigger”, add a name and a schedule. In my example “0 0 */2 * * *” will schedule this to run once every 2 hours. Hit “Create”
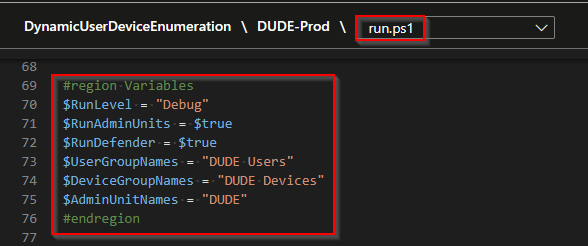
Select “Code + Test” and remove any existing code from “run.ps1”. Copy the script from my GitHub: DUDE.ps1, paste it in “run.ps1” and make sure to update the variables before you hit “Save”.
After the function has executed according to your schedule, select “Monitor” and select the latest invocation and you should see a log like this:
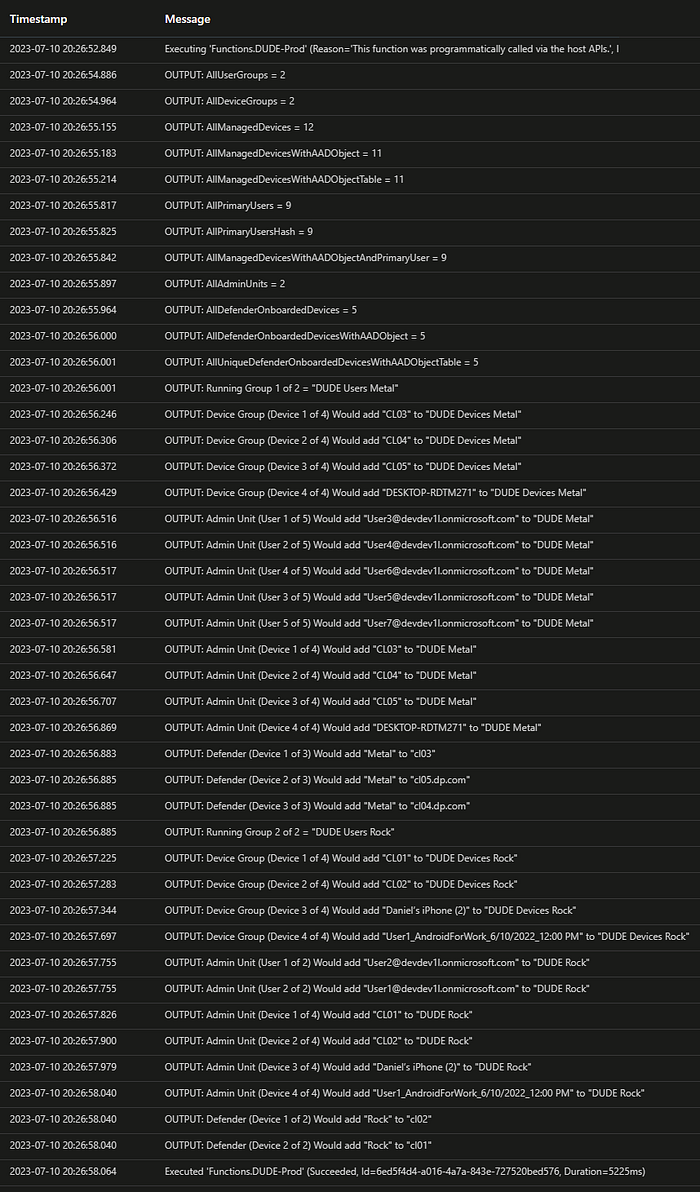
This log is great for troubleshooting and since we had the $RunLevel set to “Debug”, no changes where made but we can easily see what changes will be done when we change the $RunLevel to “Prod”.
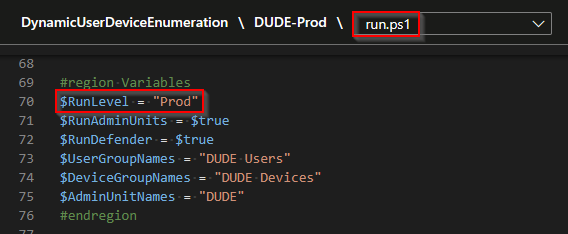
When you feel happy with the output, select “Code + Test”, change $RunLevel to “Prod” in “run.ps1” and hit “Save”:
Again, after the function has executed according to your schedule, select “Monitor” and select the latest invocation and you should see a log like this:
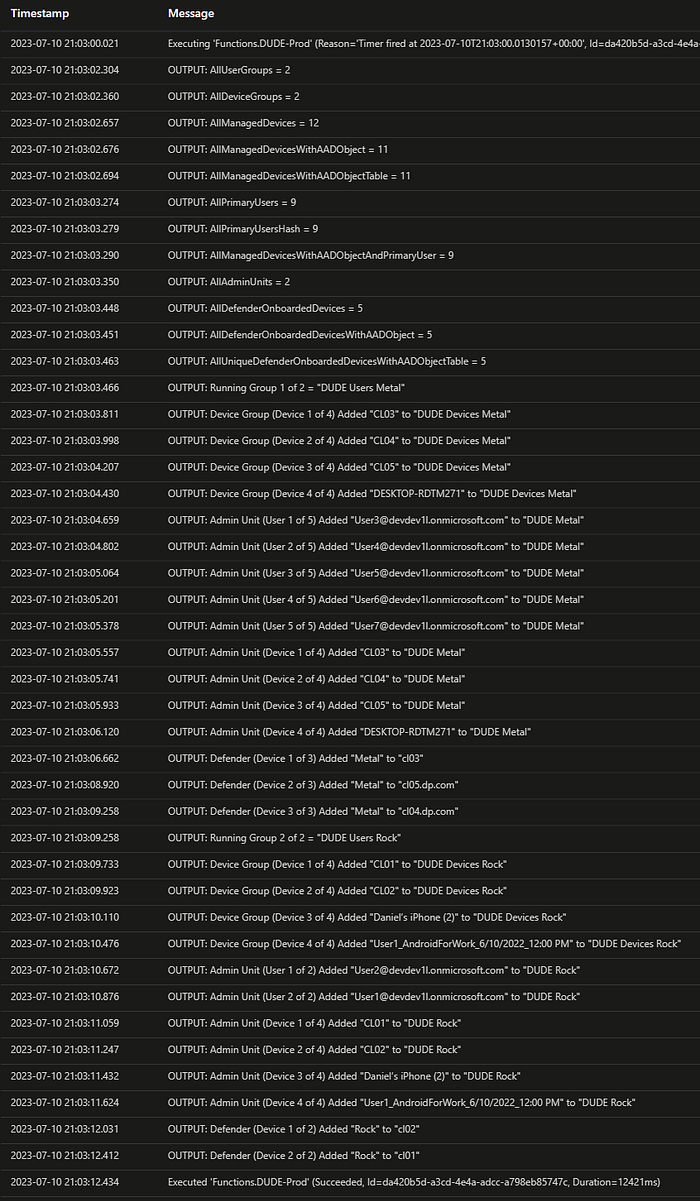
That’s it! We’re done! You have now automated the dynamic population of device groups in Azure AD, dynamic user and device population in Admin Units and dynamic Machine Tags in Defender for Endpoint based on dynamic user groups.
Hope this makes your admin life easier! To be continued…
🤘🏻
DUDE FAQ
- I want to have other names on my groups, admin units and tags, is that possible?
Yes, just make sure that the user group names in Azure AD starts with “DUDE Users “ and that the device group names in Azure AD starts with “DUDE Devices “ and that the admin units in Azure AD starts with “DUDE “ and that whatever you choose to put after this in the names match between the three. You can for example use “DUDE Users Sweden”, “DUDE Devices Sweden” and “DUDE Sweden”. - I want to use another Azure AD attribute to my dynamic user groups, is that possible?
Yes, you can use any supported dynamic membership rule in the user groups. - I want to use a different scope tag name than the group names, is that possible?
Yes, you can name the scope tags anything you want. The scope tag part is a once per device group setup and/or assignment. - What will the Machine Tag be in Defender for Endpoint and what happens to other existing tags?
The machine tag will be the ending of the device group name. If the device group is called “DUDE Devices IT” the Machine Tag will be “IT”. DUDE will not change any other existing tags in Defender for Endpoint. - I want to apply specific configuration to my devices during the autopilot process, is that possible?
Yes, nested groups will be excluded so you can use nested groups to include your autopilot devices in the device groups.
